How to Use Stable Diffusion for Logo Design, Effortlessly
Unlock the secrets of AI-powered logo design with our expert guide on Stable Diffusion prompts. Learn how to craft prompts that turn your ideas into stunning logos. Click to transform your brand's identity!
Using Stable Diffusion for Logo Design, an Introduction
Welcome to the dynamic realm of graphic design, where the marriage of creativity and technology is constantly pushing boundaries. One innovation that's making waves in this ever-evolving landscape the approach of using Stable Diffusion for Logo Design. It's not just a passing trend; it's a transformational force for both designers and brands, offering an unprecedented level of customization and creative potential.
Stable Diffusion logo design isn't just about following a set process; it's an artistic odyssey. It empowers designers to turn ordinary text into visually captivating logos, blending the precision of AI with the magic touch of human creativity. Whether you're a seasoned design pro or an aspiring entrepreneur, grasping the ins and outs of Stable Diffusion can take your branding endeavors to exciting new heights.
So, let's dive in and explore this innovative tool that's shaking up the world of graphic design!
💡
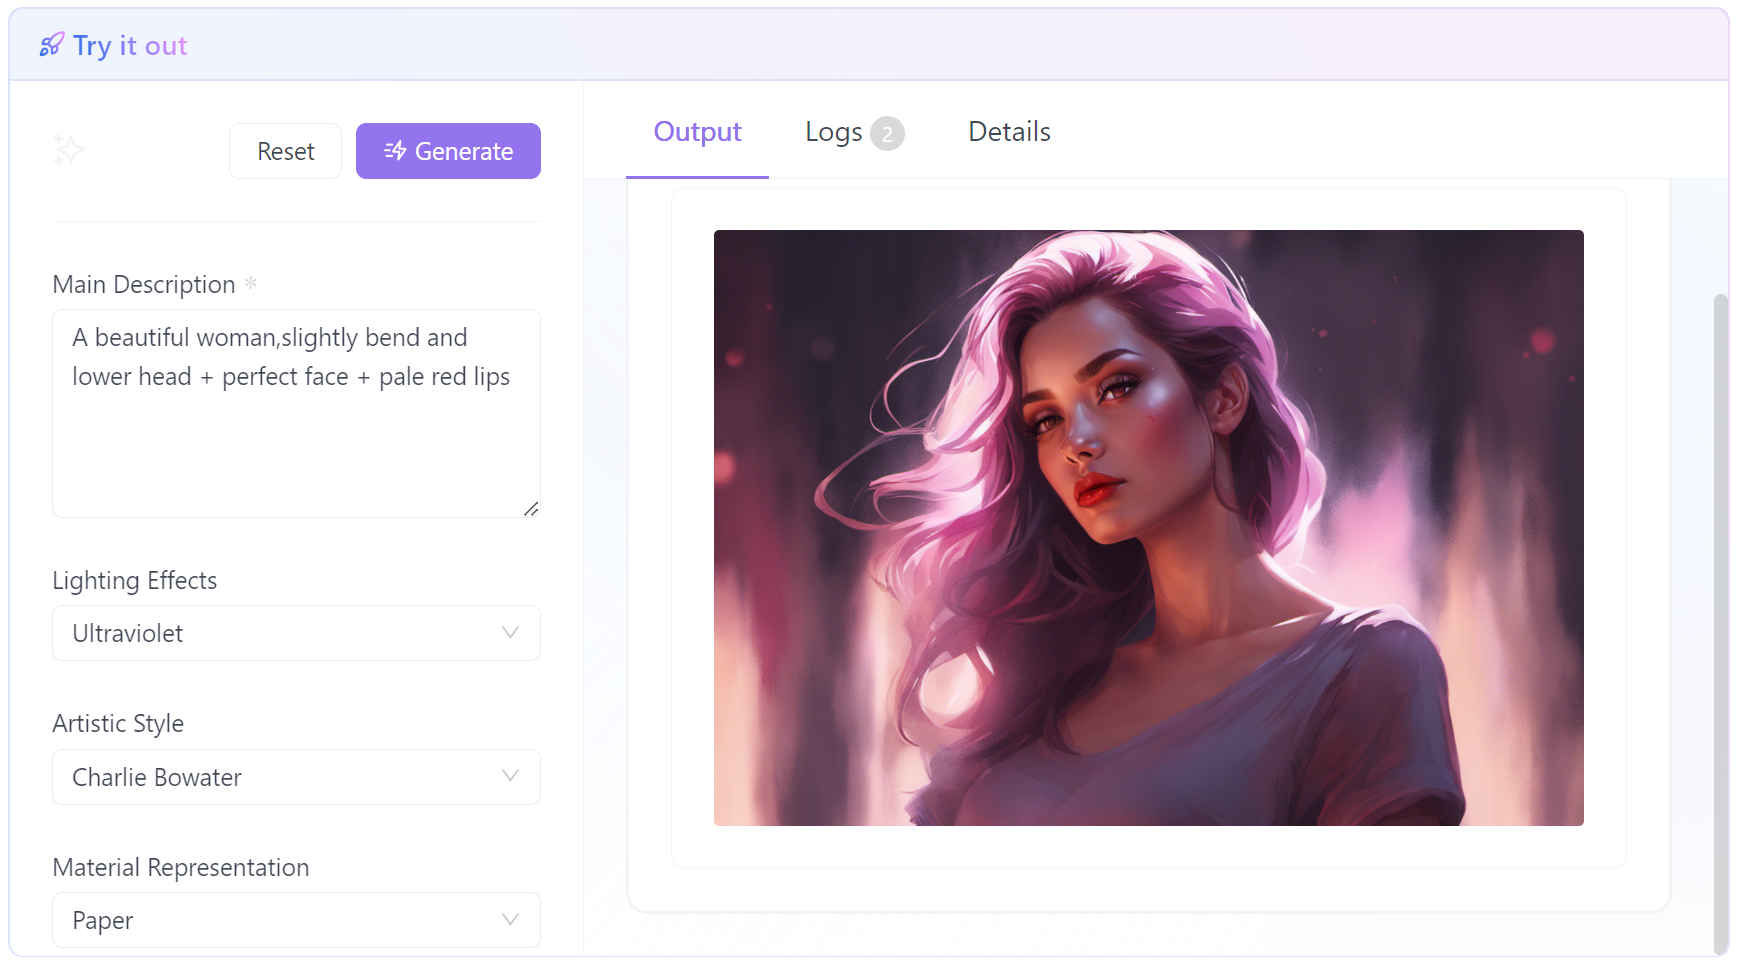
Tip: Instead of trying to run the Stable Diffusion Model locally, why not try a free, online version of Stable Diffusion that gives you quick results without the hassle of local installation?
No need for complicated installation process, simply input your prompt, and click on the Generate button to see the magic!
If you would like to have more control over the result, it even gives you extra control of Advanced Parameters!
Stable Diffusion, in the context of graphic design and logo creation, is a technique that combines the power of artificial intelligence (AI) and creativity to assist designers in crafting unique and visually striking logos. Here's a more direct explanation of how Stable Diffusion can benefit you as a graphic designer:
AI-Driven Logo Creation: Stable Diffusion is an AI-powered tool that takes your textual descriptions and transforms them into detailed logo designs. It's like having an AI-driven digital artist at your disposal, ready to bring your ideas to life.
Visualization of Ideas: If you have a vision for your logo but struggle to illustrate it, Stable Diffusion can bridge that gap. You describe your concept in words, and the technology interprets and visualizes it, saving you the effort of sketching or designing from scratch.
Efficiency and Speed: Stable Diffusion streamlines the logo design process. It's quick and efficient, reducing the time and effort required to create a logo. This is especially useful for meeting tight deadlines or exploring multiple design concepts rapidly.
Creative Exploration: As a graphic designer, you can use Stable Diffusion to experiment with various design ideas and concepts quickly. It's a valuable resource for brainstorming and exploring different directions for your projects.
Steps for Stable Diffusion for Logo Design
Here is a quick summary of designing a good logo for Stable Diffusion:
💡
Step 1. Prepare Input Image: Begin by creating a square canvas, adding text with a black outline on a white background, and save it as an image file.
Step 2. Download Necessary Files: Obtain essential files, including ControlNet, checkpoints, and LoRAs, to enable the Stable Diffusion process.
Step 3. Configure Stable Diffusion Settings: Set up Stable Diffusion with the right checkpoint, creative prompts, sampling methods, and image dimensions.
Step 4. ControlNet Settings (Line Art): Utilize the ControlNet web interface to optimize logo creation by importing your input image, selecting "Line Art," and enabling ControlNet.
Step 5. Explore More Creative Logos: Experiment with advanced ControlNet settings to infuse creativity and clarity into your logos.
Step 6. Create More Than Logos: Extend Stable Diffusion's capabilities to create various artwork beyond logos by adjusting dimensions and exploring different models.
Step 7. Final Logo Touches, Upscaling, and Editing: Enhance logo images with upscaling, fine-tuning, and experimentation.
Step 8. Logo Art Examples: Draw inspiration from remarkable logo examples crafted using Stable Diffusion.
Wtih these steps in mind, Let's get Started:
Step 1. Prepare Input Image for Stable Diffusion
To begin the process of creating captivating logos using Stable Diffusion, you'll first need to prepare your input image. Here are the detailed steps:
Open Adobe Photoshop or any image editing software of your choice.
Create a square canvas to serve as the foundation for your logo.
Add a white background to your canvas by creating a new layer and filling it with white color.
Utilize the Text Tool to inscribe your desired text in white, positioning it appropriately on the canvas.
Enhance the text by applying an outline effect. To achieve this, access "Layer Styles" and select "Stroke." Adjust the outline thickness to a value between 3 to 5 pixels and choose a black color for the outline.
Once your input image is polished and visually appealing, save it as a JPEG or PNG file. It should resemble something similar to "how-to-make-logos-in-stable-diffusion-input-image.jpg."
Step 2. Download These Files for Stable Diffusion
Before diving into logo creation with Stable Diffusion, it's essential to have the required files readily available. Here's a breakdown of the necessary files and checkpoints:
ControlNet: This is a fundamental component of the Stable Diffusion process. Ensure you have ControlNet installed and ready for use.
ControlNet checkpoint: You'll need the "control_v11p_sd15_lineart.pth" checkpoint file.
DreamShaper checkpoint: Another essential checkpoint file that contributes to the quality of your logo designs.
LoRAs: You'll require the "AnyLogo LoRA" and "3DMM LoRA" models to enhance your logo creation process.
Having these files in place before you begin will streamline the logo design journey in Stable Diffusion.
Step 3. Stable Diffusion Settings
Properly configuring Stable Diffusion settings is pivotal to achieving outstanding logo designs. Below are the critical settings you should consider:
Checkpoint Selection: While "dreamshaper checkpoint" is recommended, most checkpoints are suitable for logo creation.
Prompts: Crafting the right prompts is crucial. Use descriptive and creative prompts that align with your vision. Consider browsing the CivitAI Logo page for inspiration or use a prompt generator for fresh ideas. Don't forget to incorporate the LoRAs into your positive prompts.
Sampling Method: Opt for "DPM++ 2M Karras" as it yields excellent results for logo designs. This method gradually refines the image, enhancing its quality.
Sampling Steps: To ensure high-quality results, set a minimum of 25 sampling steps. Increasing this value can further improve image quality.
Width & Height: Maintain aspect ratio consistency by using dimensions like 512x512 or 768x768. Most checkpoints are trained for these ratios, and you can always upscale your logo later if needed.
Having these Stable Diffusion settings configured properly sets the stage for successful logo design.
Step 4. ControlNet Settings (Line Art)
Now, let's transition to using the Stable Diffusion web interface, specifically ControlNet, to further enhance your logo creation process:
Open the ControlNet interface, where the magic happens.
Import the input image you meticulously prepared earlier by dragging and dropping it into the ControlNet interface.
Configure the control type to "Line Art." This optimizes the model for logo and graphic design, emphasizing clean lines and precision.
Set the Preprocessor to "Invert" for additional image enhancement.
Enable ControlNet and set it to "Pixel Perfect" to achieve a high level of detail and precision in your logo designs.
These ControlNet settings ensure that your logos are not only visually appealing but also refined and well-defined.
Step 5. More Creative Logos in Stable Diffusion
For those seeking to infuse more creativity and uniqueness into their logos, consider these advanced settings:
In the ControlNet settings, slightly increase the starting control steps to skip the ControlNet extension during the initial stages of image generation. Conversely, slightly decrease the ending control step to skip the ControlNet extension towards the end of the process. Adjust the control weight if the text in your logo isn't as clear as desired.
These adjustments enable you to experiment with different levels of creative control, resulting in more artistic and visually captivating logos.
Step 6. Create More Than Logos in Stable Diffusion
Stable Diffusion isn't limited to just logo designs; you can also leverage it for creating various other types of artwork. Here's how:
Adjust the image width to fit your desired banner size or artwork dimensions.
Experiment with different checkpoints and LoRAs to explore diverse creative possibilities.
Maintain the ControlNet settings as previously configured for logo design.
This versatility allows you to explore beyond logos and delve into creating banners and other artwork with ease.
Step 7. Add Final Touches for Logo, Upscaling, and Editing
Once you've generated your logo images, you may want to make some final adjustments to enhance the output further:
Upscale your image using a medium denoising strength. Refer to an Upscale Guide for detailed instructions on this step.
Fine-tune the text and overall appearance of the images if necessary. Utilize software like Adobe Photoshop to refine your logos and make them pixel-perfect.
Experiment with combining different LoRAs to create truly unique and captivating results.
Don't be afraid to explore, mix things up, and push the boundaries of your creativity to uncover new design possibilities.
With these additional steps, you can put the finishing touches on your logo designs and ensure they meet your exact specifications.
Step 8. Logo Art Examples in Stable Diffusion
To provide visual inspiration and showcase the remarkable potential of Stable Diffusion, here are some examples of logos crafted with this innovative AI-driven approach:
These examples demonstrate the magic of Stable Diffusion and the incredible logo designs it can help you create.
Conclusion
In conclusion, you've embarked on a journey to transform ordinary text into captivating images using the power of Stable Diffusion. This comprehensive tutorial has guided you through a step-by-step process for creating logos, banners, and various forms of artwork. By harnessing the capabilities of ControlNet and creative prompts, you've unlocked endless possibilities for stunning visuals.
Remember that experimenting with different checkpoints and LoRAs is the key to unleashing your creative potential and achieving impressive results. Whether you're a seasoned graphic designer or just starting, Stable Diffusion empowers you to craft visually striking designs with ease.
So, go ahead, fine-tune your creations, and let your imagination run wild. With Stable Diffusion, the possibilities are boundless, and your artistic potential knows no limits. Happy designing!
💡
Tip: Instead of trying to run the Stable Diffusion Model locally, why not try a free, online version of Stable Diffusion that gives you quick results without the hassle of local installation?
No need for complicated installation process, simply input your prompt, and click on the Generate button to see the magic!
If you would like to have more control over the result, it even gives you extra control of Advanced Parameters!
Can you make logos with stable diffusion?Absolutely! Stable Diffusion is adept at transforming textual descriptions into detailed, unique logos. It's a powerful tool for anyone looking to create a distinctive brand identity.
How to design a logo with AI?Designing a logo with AI involves preparing an initial design or text, using tools like ControlNet for precision, crafting effective prompts, and iterating based on the AI's output. Upscaling the final design ensures high-quality results.
How do I create a logo in generative AI?Creating a logo with generative AI, like Stable Diffusion, requires a combination of technical know-how and creativity. Start with a clear concept, use AI tools to generate initial designs, and refine them through iteration and upscaling.
How does stable diffusion image to image work?Stable Diffusion's image-to-image feature allows you to input an existing image, which the AI then uses as a base to generate new, creative interpretations based on your prompts and settings.