Fooocus - Best Stable Diffusion UI for Prompt Engineering
Are you tired of complex prompt engineering in Stable Diffusion? Discover Fooocus, the intuitive alternative that brings the fun back into AI image creation. Read on to learn how!
Hey there, fellow Stable Diffusion enthusiasts! If you're anything like me, you love the power of AI image generation but maybe find the prompt engineering a bit of a headache. Well, let's talk about Fooocus. This nifty tool is like a breath of fresh air for us creatives who just want to get straight to the fun part - making cool images without getting bogged down in technicalities.
Imagine having a tool that takes the heavy lifting off your shoulders, leaving you to just play around with ideas and see them come to life. That's Fooocus for you – straightforward, no hassle, and it still packs a punch!
What is Fooocus
So, what's this Fooocus all about? In plain terms, it's an image generating software that's built on the same muscle as Stable Diffusion, but with a twist.
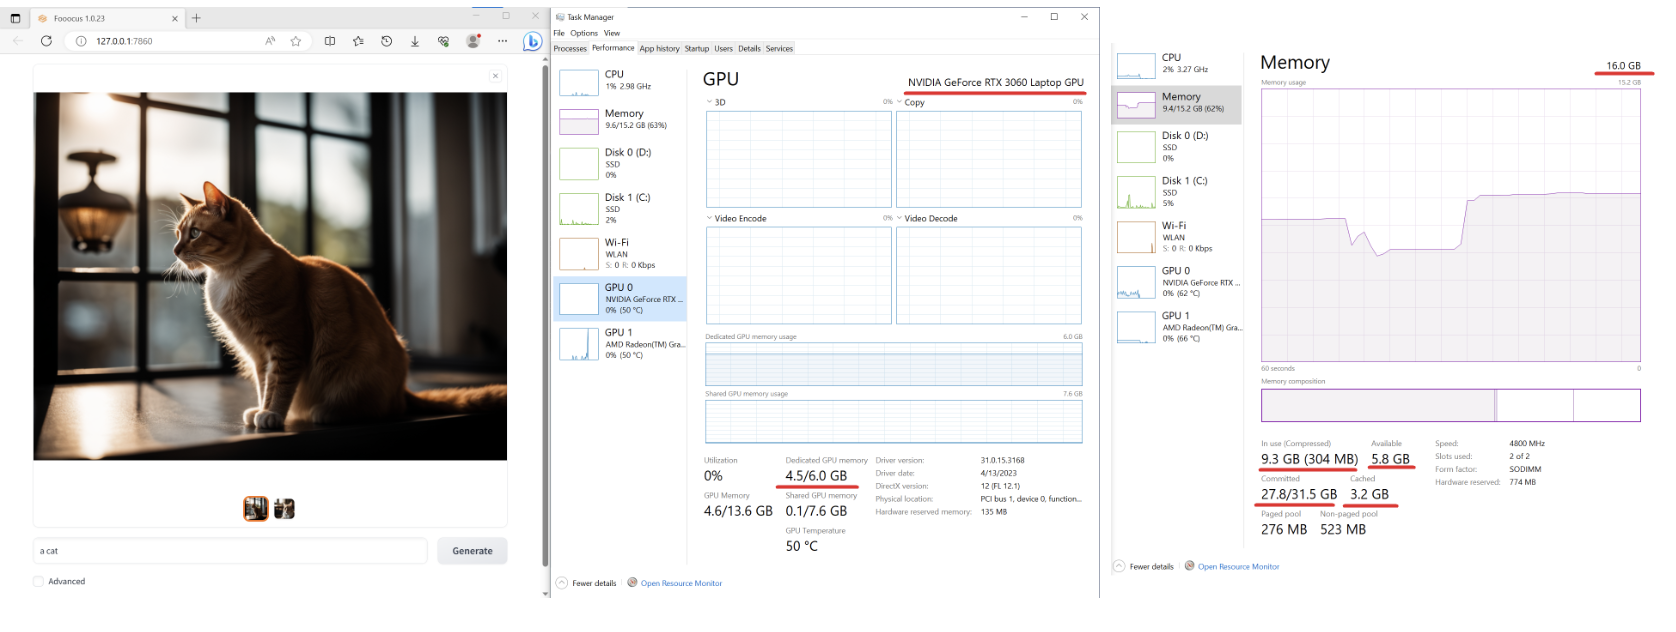
Actual Memory Useage of Fooocus
Fooocus is designed for folks who'd rather skip the complex prompt engineering and just dive into creating.
Here's the rundown:
Offline & Open Source: Just like Stable Diffusion, Fooocus works offline and is completely open source. You get the full freedom to use and tweak it as you please.
Simplicity is Key: Borrowing a leaf from Midjourney's book, Fooocus is all about ease of use. You don't need to fiddle with a bunch of settings; focus on your prompt, and let Fooocus handle the rest.
Quality Outputs: Despite its simplicity, Fooocus doesn't skimp on quality. It's got all these nifty inner optimizations and improvements to make sure your images look top-notch.
In short, it's like the friendly neighbor of Stable Diffusion – less intimidating, equally capable, and just waiting to help you bring your creative ideas to life.
💡
Tip: Instead of installing Stable Diffusion locally, why not try a free, online version of Stable Diffusion that gives you quick results without the hassle of local installation?
What Are Default Stable Diffusion Models that Fooocus Use?
Now, let's get a bit technical and talk about the default models that Fooocus uses. If you're already familiar with Stable Diffusion, you know that the model you choose can really shape the outcome of your images. With Fooocus, you get a range of pre-set models tailored for different types of imagery.
General Use: For your everyday image generation needs, Fooocus uses the juggernautXL v6_RunDiffusion model. It's a solid all-rounder for a variety of themes and styles.
Realistic Images: If you're aiming for more lifelike pictures, there's the realisticStockPhoto preset. It's tuned to give you images that are closer to real-life photographs.
Anime Style: For the anime enthusiasts out there, Fooocus hasn't forgotten you. The bluepencil_v50 model, coupled with dreamsharper_v8 for refining, gets you those vibrant anime-style images.
The beauty of Fooocus is that it automates the selection of these models based on your input, so you don't have to worry about picking the right one every time. Just focus on what you want to create, and Fooocus will handle the rest.
How to Use Fooocus as a Midjourney & Leonardo AI Alternative
If you're well-acquainted with Midjourney or Leonardo AI but yearning for something more straightforward, Fooocus is your go-to. It stands out with its simplicity and user-friendly approach, perfect for those of us who prefer focusing on creativity rather than technicalities. Here's how to switch gears to Fooocus:
Start with Your Vision: With Fooocus, you begin with your image idea - no complex prompt engineering needed. Whether it's a 'house in a garden' or a more elaborate scene, just type in your prompt.
Let Fooocus Do the Heavy Lifting: Thanks to its built-in GPT-2 based prompt processing engine and numerous sampling improvements, Fooocus works its magic to transform your prompt into a beautiful image, regardless of its length or complexity.
Explore Advanced Features if You Wish: For the adventurous ones, Fooocus also offers advanced features borrowed from LeonardoAI, like 'Style' adjustments and 'Sampling Sharpness', giving you the freedom to fine-tune your creations.
Using Fooocus is like having a friendly AI assistant who gets what you want without you having to spell it out in technical jargon. It's all about bringing your ideas to life, minus the hassle.
How to Install Fooocus on Windows
Ready to get Fooocus up and running on your Windows machine? Follow these steps, and you'll be creating in no time:
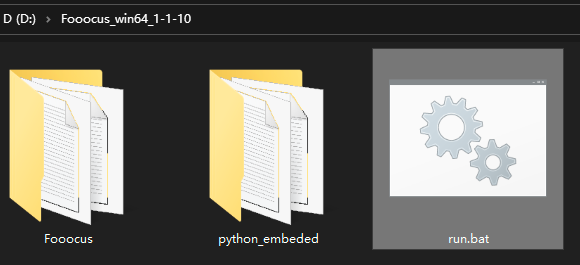
Find the 'run.bat' file in the uncompressed folder and double-click it.
This will initiate the installation, and Fooocus will automatically download the necessary models into the 'Fooocus\models\checkpoints' folder.
Install Fooocus on Windows
First Launch:
On your first run, Fooocus might download additional models, like the inpaint control model, if you're planning to use inpainting features.
System Requirements:
Ensure your system meets the minimum requirements: 4GB Nvidia GPU memory and 8GB system RAM. Most modern laptops with a decent Nvidia card should work fine.
Troubleshooting:
If you encounter any issues like 'MetadataIncompleteBuffer' or 'PytorchStreamReader', it might indicate corrupted model files. Try re-downloading the models.
And that's it! With these simple steps, you'll have Fooocus ready on your Windows device, geared up to bring your creative visions to life.
How to Install Fooocus on Mac
Installing Fooocus on a Mac, especially those with Apple Silicon (M1/M2 chips), is a bit different but still straightforward. Here’s your guide:
Install Conda and PyTorch:
First, install the Conda package manager and PyTorch with MPS (Metal Performance Shaders) support for GPU acceleration.
Ensure PyTorch recognizes your MPS device (this is crucial for Apple Silicon Macs).
Open Terminal and clone the Fooocus repository with:
For the first launch, it will download the Stable Diffusion SDXL models, which might take some time depending on your internet speed.
System Requirements:
Macs with Apple Silicon don't have dedicated GPUs, so expect longer image processing times compared to systems with dedicated graphics cards.
There you have it! While Macs might not be the first choice for heavy-duty AI image generation, Fooocus still makes it possible to dabble in this creative field on your Apple device.
How to Install Fooocus on a Linux VPS
Installing Fooocus on a Linux Virtual Private Server (VPS) is a great option for those who need more power than what their local machine offers. Here’s how to set it up:
Prepare Your Linux Environment:
Ensure you have Python 3.10 installed. Most modern Linux distros come with Python pre-installed.
Update your system and install necessary dependencies like Git.
Clone Fooocus Repository:
Use the command git clone https://github.com/lllyasviel/Fooocus.git to clone the Fooocus repository.
Navigate into the cloned directory with cd Fooocus.
Set Up Python Virtual Environment:
Create a Python virtual environment using python3 -m venv fooocus_env.
Activate the environment with source fooocus_env/bin/activate.
Install Dependencies:
Install required Python packages with pip install -r requirements_versions.txt.
Launch Fooocus:
Start Fooocus by running python entry_with_update.py.
On the first run, Fooocus will download necessary models. Ensure your VPS has an internet connection.
Additional Options:
For remote access, use python entry_with_update.py --listen.
Choose between different presets like anime or realistic using --preset anime or --preset realistic.
That’s all! With Fooocus running on a Linux VPS, you can leverage more computing power for your AI-driven creative projects.
How to Install Fooocus with Google Colab
Google Colab offers a convenient way to use Fooocus, especially if you don’t have a powerful machine. Here’s how to get it running:
Execute the setup cells in the notebook. This will install necessary dependencies and set up the environment for Fooocus.
Modify the Launch Command:
Modify the last line of the notebook to suit your needs, like !python entry_with_update.py --share for sharing your session.
You can also select presets like anime or realistic with --preset anime or --preset realistic.
Execute and Use:
Run the modified command to start Fooocus.
Keep in mind that Colab's free version has limited resources, so some features may be disabled by default.
Google Colab is a fantastic option for those who want to experiment with Fooocus without any local installations.
Fooocus Customization: How to Edit the Config File
Personalizing Fooocus to your liking can significantly enhance your image generation experience. Here’s how to customize it:
Edit the Configuration File:
After your first launch of Fooocus, a config.txt file will be generated in the Fooocus directory.
Edit this file to change model paths, default parameters, and more.
Understand the Config Options:
The config file includes options like path_checkpoints, default_model, default_sampler, and more.
Customize these settings based on your preference and needs.
Experiment with Different Presets:
Try using different launch commands like run_anime.bat or run_realistic.bat for varied styles.
Remember, changing configs can alter your results significantly, so feel free to experiment.
Customizing Fooocus is a great way to tailor the software to your specific creative needs and preferences.
Tricks and Tips for Using Fooocus
Once you've got Fooocus up and running, here are some tricks and tips to make the most out of this powerful tool:
Leverage Multi-Prompt Feature:
You can use multiple lines of prompts for more detailed and specific image generation. Just separate each prompt idea on a new line.
Utilize Prompt Weights:
Adjust the influence of different parts of your prompt by using weights, like "sunset (1.5) over a mountain (0.5)" to emphasize the sunset more.
Experiment with Advanced Features:
Dive into the 'Advanced' tab to tweak settings like 'Sampling Sharpness' or 'Style'. These can dramatically change the look and feel of your generated images.
Use Negative Prompts:
If there's something you definitely don't want in your image, use negative prompts in the 'Advanced -> Negative Prompt' section, like "-crowds" to avoid crowded scenes.
Try Different Aspect Ratios:
Play with different aspect ratios in the 'Advanced -> Aspect Ratios' section to see how it affects your image composition.
FaceSwap with InsightFace:
If you’re into portrait generation, use the 'Image Prompt -> Advanced -> FaceSwap' feature for interesting results.
Remember, the key to mastering Fooocus is experimentation. Don’t be afraid to try different combinations and see what works best for your creative vision.
How to Translate Fooocus (i18n feature)
Fooocus also offers internationalization (i18n) support, allowing you to translate its interface into different languages. Here's how you can do it:
Create Translation Files:
In the Fooocus/language folder, create JSON files for your desired language, like jp.json for Japanese or cn.json for Chinese.
Add Translations:
In your JSON file, map the English interface terms to your target language. For example:
{
  "Generate": "生成",
  "Input Image": "入力画像"
}
Apply the Translation:
To use your translation, edit the launch command in your run.bat or equivalent file to include the --language flag, like --language jp for Japanese.
Share and Contribute:
If you create a translation, consider sharing it with the Fooocus community to help others who speak your language.
Translating Fooocus can make the tool more accessible and enjoyable for non-English speaking users, fostering a more inclusive community.
Conclusion
Fooocus is more than just an AI image generator; it's a gateway to creative freedom. Whether you're a seasoned artist or just starting out, Fooocus offers an easy, enjoyable way to explore the world of AI-driven art. With its simple installation, user-friendly interface, and powerful features, it's an ideal tool for anyone looking to dive into the realm of AI without getting overwhelmed by technical complexities.
Remember, the key to getting the most out of Fooocus is to experiment and have fun with it. The more you play around with its features, the more you'll discover its potential to bring your imaginative ideas to life.
So go ahead, give Fooocus a try, and unleash your creativity!
💡
Tip: Instead of installing Stable Diffusion locally, why not try a free, online version of Stable Diffusion that gives you quick results without the hassle of local installation?